Scaling and growing a business are often used interchangeably, but they’re two different things. Growing a business means increasing your sales. Scaling a business means increasing your sales without adding excessive labor costs and business problems along with those new sales.
If you want to scale your business or reduce labor costs, we recommend that customers follow the steps below. If you’re on a budget, start with step #1, and work your way down to step #4. Step #5 (reduce curing time) is listed last due to length, not because it should be your last step.
These guidelines will apply to most customers, but every soap maker has a different process and different needs. If you’re on a tight budget and want to know with 100% certainty which equipment will give you the highest return on investment, you will need to do a time study on your production process and send it to us. Your goal should be to buy equipment that saves you the most time for the least amount of money.
Step #1: Masterbatch Your Oil & Lye
Your first step will be increasing the size of your oil and lye batches to minimize prep time and maximize efficiency. We commonly see small soapers making soap on a per mold basis – measuring, heating, mixing, etc., multiple times a day for each mold. This increases labor costs and reduces the ability to scale.
You shouldn’t prep your oils and lye more than once per day. Masterbatching lye for multiple days is more common (and cheaper) than masterbatching oil, but both will increase your production efficiency. Ideally, you would masterbatch both, making enough for multiple days or the entire week.
We strongly recommend reducing the number of base oils you use as you scale up. It’s not a coincidence that some of the largest cold process producers in the world use just one or a few different base oils. They became large producers because they designed a simple and efficient system that was easy to manage as they increased their sales. It’s easy (and fun!) to play around with different oils and recipes when making soap in crock pots. However, having multiple recipes with different base oils will significantly increase your operations’ complexity and equipment cost. We’re happy to sell you a lot of small tanks, but it’s easier and cheaper to buy just one or two large tanks that can handle all of your needs.
Using a soapmaking software to help you keep track of recipes, batches and do cost analysis for your recipes is a great way to make this process easier. We recommend https://soapmakingfriend.com as it’s a great lye soap calculator that will help you do all of the above!
TIP: Avoid measuring material in individual pitchers when masterbatching in large tanks. Place your tanks on top of a scale, zero it out, then measure your oils on the scale as you add them to your tank. This is faster and more accurate than measuring multiple individual pitchers on a small scale. If you have additives that weigh less than a pound, they still need to be measured on small scales.
TIP: Add all oils to your tank the night before you plan on using them and set your tank timer to turn on a few hours before you get into the office. Your oils will be ready to go when you get in, meaning you don’t have to wait for your oils to melt!
Masterbatching Lye
Masterbatching Oil & Lye
Step #2: Increase Batch Size
Small batches reduce your output and increase your labor cost. It takes roughly the same time to pour and trace a five-pound and 125-pound batch. Let’s assume that a five-pound batch takes four minutes to pour and trace and a 125-pound batch takes nine minutes. Your production increases by 52x at the cost of five extra minutes.
While large molds are more efficient, you don’t need them to increase output and save time. You can make larger batches and use multiple small molds.
Efficient Preparation Tips:
- Mix in the Pot Tipper: Our 80 Quart Pot Tipper can hold up to 130 pounds (60kg) of soap at once. Our 164 Quart Pot Tipper doubles that, holding up to 260 pounds (120kg). Once the soap is traced, use the Pot Tipper to pour directly into your molds.
- Use a Floor Scale: Place a Pot Tipper Floor Scale between your tanks. Roll the Pot Tipper on the scale, zero the scale, and dispense your oil. Follow the same steps for the lye. This method eliminates back and forth with different containers and scales.
- Prep Your Additives: This is the same concept as masterbatching above. Don’t wait to measure your additives until your soap is in your pot tipper. Measure ahead of time (for the day or week) and store in containers, then all you have to do is open and add to your mix when the time comes. This prep work will decrease production time and increase consistency between batches.
Mixing in a Pot Tipper
Measuring Ingredients in a Pot Tipper
Step #3: Increase Mold Size
Once you’re masterbatching your inputs (step #1) and making soap in larger batches (step #2), you can increase the size of your molds. Large molds save time on lining, assembling, disassembling, cleaning, and space. Think about it – you can assemble one large mold that holds 400+ bars or multiple small molds that won’t come close to that amount.
Just like with your batch size, it takes roughly the same time to pour a 125-pound (57kg) mold as a five-pound mold (especially with our Pot Tipper). Yes, larger molds have a longer saponification time, but this doesn’t take extra labor time from you. In fact, the proper equipment can enable you to increase your sales while reducing labor costs and production time. We’ve had customers move from single loaf molds to large block molds and increase their production 5-10x while cutting labor time in half. Making small batches in small molds takes an enormous amount of time.
TIP: Create a template and pre-cut liner paper for your large molds. This way, you can grab and go instead of measuring the paper each time you need to line. Some customers forgo lining with paper and use trash bags as liners. If you go with the trash bag method, be sure to ask for a trim cut on your molds.
Rectangular Bars: Rectangular bars are the best option for increasing your production without increasing labor. A Manual Cutter Mold will hold 70-100 lbs (32-45kg) of soap. An Air Cutter Mold can hold 90-115lbs (41-53kg) of soap. Note that the Manual Cutter Mold is poured in two cells while the Air Cutter Mold is one large single cell.
Circular Bars: Our Tube Mold Systems allow you to pour large quantities of circular bars at once. The 2″ system holds 75lbs (34kg) total, the 2.43″ system holds 55lbs (25kg), and the 3″ system holds 84lbs (38kg).
Pouring into an Air Cutter Mold
Pouring into a Manual Cutter Mold
Step #4: Decrease Cutting Time
Minimizing cutting time and increasing your mold size go hand in hand. Your goal is to cut as many bars as you can with the fewest possible cuts.
You should produce soap in large blocks if you’re making rectangular bars. These blocks will be cut in two steps. The first step is your loaf cut, and the second step is your bar cut. The loaf cut takes the place of having to use dozens of individual loaf molds. For example, making a 3″ x 2″ x 1″ bar in an Air Cutter mold will get you 42 loaves per mold (first cut) and 13 bars per loaf (second cut), which gives you 546 bars per mold. In this situation, the loaf cut replaces 42 single loaf molds with one block mold.
After you cut your loaves, stack them together to cut all of them at once. Continuing the example above, your bar cut will give you 546 bars with a single cut (13 bars per mold x 42 loaves). This bar cut with multiple loaves stacked together replaces 42 individual bar cuts with a small loaf cutter.
You should be stacking your loaves and cutting multiple bars at once, even if you’re not using block molds. If you are making circular bars (shampoo bars, shaving bars, etc.) then you can still stack these loaves on top of each other and still cut in bulk.
Once your bar cut is done, you will need to stack your soap so it can cure. You’ll know you have an efficient process when most of your cutting time is spent stacking soap and not cutting bars. Stacking will go faster if you use our Vented Drying Trays on either side of your cutting station for a quick transfer.
Tip: If making rectangular bars and using large molds, use hoists to make your process safer and easier. Your soap blocks will weigh over 100lbs, and you want to avoid exhaustion and injuries.
Cutting Cold Process Soap with the Air Cutter
Cutting Goat Milk Soap with the Air Cutter
Step #5: Minimize Curing Time
Reducing curing time is one of the most important steps you can take to make your business successful. Long curing times will take up space (increasing rent), increases time from money being spent to money being received (higher work in process), makes it take longer to respond to changes in sales, causes too much or too little inventory when sales do change, and decreases competitiveness when bidding on contracts.
It is worth spending the time and money to shorten curing times as much as possible. Curing time is important because it’s the biggest driver of work in process (WIP) for soap makers. Work in process (WIP) is inventory that you have in process that isn’t ready to sell. High WIP means it costs more to run your business, you have more money tied up in inventory, and your business consumes cash in the short term as it grows. Sales growing while cash decreases can lead to a cash crunch or “growing broke” (more on this below).
The most effective methods of decreasing your curing time are:
- Vented Drying Trays: Maximize the air that flows between your bars, speeding up your curing time by up to 25%.
- Water Discount: Lowers the total amount of water in your soap, reducing the amount that needs to evaporate during curing. Be careful as it will also reduce trace time.
- Dehumidifier: These will suck water out of the air speeding up your curing time. It will be more effective if combined with Vented Drying Trays and fans to maximize airflow.
- Fans: Will increase airflow. It will be less effective if used without vented trays. Combine with a dehumidifier for maximum effect.
Curing Times, Cash Crunches, and Growing Broke:
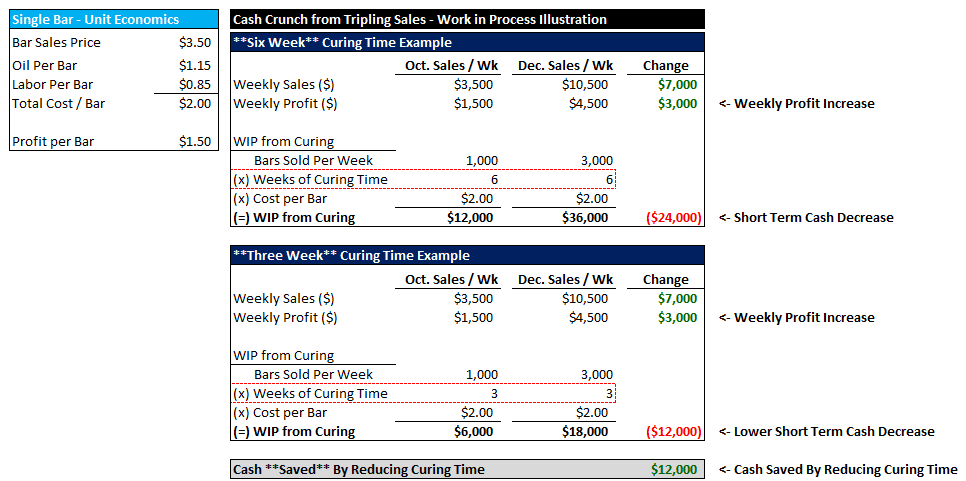
Growth is a great thing. However, as your business grows, it generates cash in the long term while consuming it in the short term(1). For example, assume you sell 1,000 bars per week throughout the year, then increase your sales to 3,000 bars per week in the last two weeks of November and all of December.
This holiday growth will lower your cash in September and October. This is because you have to increase your soap production in September from 1,000 to 3,000 bars per week. You’re paying extra for materials and labor in September and October for sales you won’t get until November and December. Your profits will go up at the end of the year, but money in the future doesn’t pay your bills today(2).
Let’s assume your bar costs $2.00 (labor and material), sells for $3.50, and you have a six-week curing time. You will earn an extra $18,000 in profit due to your holiday sales, but your business will consume $24,000 in the short term as you scale your production(3).
If we reduce your curing time to three weeks, your business will consume $12,000 instead of $24,000 when you increase your production. In other words, by cutting your curing time in half, you will have $12,000 extra dollars in your pocket when you need to pay your bills in September and October.
Footnotes:
(1) For simplicity’s sake, this example assumes you’re not using credit terms on vendor payables. We can isolate the effect of curing time by holding all other sort term assets and liabilities constant (DSO, DIO, DPO), so the incremental change in cash from growth will be the same.
(2) Assuming you don’t have a negative cash conversion cycle. This is done by making your customers pay you before you’ve made your product. If you get cash for your product after it has been made, you have a positive cash conversion cycle, and your business consumes money as it grows.
(3) Assumes linear cost of labor for simplicity’s sake